Instagram is a constantly changing and evolving social media platform. The picture site has become one of the fastest-growing networks in the world & whilst some of its features aren’t exactly new, it has taken some &, pretty much, revolutionized them.
None sum this up more so than Instagram Stories.
Let’s take a deeper look at this impressive feature & see how to utilize it effectively in this Ultimate Guide to Instagram Stories.
Since Instagram has adopted Stories it has quickly become one of its most important features. With 500 million daily active users, the amount of people using Instagram Stories is huge & is still climbing.
If you’re on Instagram, there’s a good chance you’ve at least viewed someone’s Story… Or you’re like me & you end up viewing more Stories than actual posts in your feed.
Jump ahead:
What are Instagram Stories?
Simply put, Instagram Stories allow you to post pictures or videos for 24 hours & then they disappear.
What I feel makes Instagram Stories so successful is its ability to humanize the user. Both the original poster & the viewer.
You’re getting a behind-the-scenes, VIP-feel, in a more convenient & consumable environment, something that hasn’t been done on such a large scale as successfully ever before.
Furthermore, Instagram Stories are fun & exciting. If you miss the 24 hours, then it’s gone, forever.
In modern times where the internet never forgets, that’s something truly unique… Even if Snapchat, Facebook & who knows how many other places are also doing it… Instagram is the one setting the trends, they’re not riding it.
P.s. I know that Snapchat invented the feature, but Instagram’s userbase & universal adaptation is what turned Stories into the social media trend it is today.

Why are Instagram Stories a big deal?
It comes down to several things.
Firstly, Instagram surpassed has surpassed 2.4 billion active monthly users. That growth plus the adaptation of more existing & new users to Instagram Stories means that you can reach even more people by properly utilizing the app.
Secondly, Instagram rewards engagement.
Instagram pushes the best content they think people will want to see. This means that if someone spends the time to go through or reply to your Instagram Story, it must be something they are very interested in seeing and your posts will appear higher in their feed (as well as their Stories timeline).
Lastly, engagement.
No, no, not like the last point, I mean the ease of engagement between you and your followers. Instagram Stories allow links if you have more than 10,000 followers. This means you can link to YouTube videos, your blog, causes that are important to you, your cat’s Patreon page, or whatever else you fancy.
This is actually a little bit more related to the second point than I originally suggested. You see, that engagement you have with your followers is a relationship that has been built up, a relationship that means the viewer will have a much higher probability of actually clicking through on your link than they would on just a random person’s profile.
That engagement is not only found in links; you have polls, questions, shares, etc. but we’ll get into all of that and more a little bit further down.
So, in this article, we’re going to have a look at all of the Instagram Stories features & how to use them. It’s going to be a doozy, so go grab a coffee (or tea, I don’t judge).
Before we get started, this is more of an in-depth & advanced tutorial. So, if you are just starting out with Instagram or Instagram Stories, I recommend reading my beginner’s guide to Instagram first, to get a better understanding and foothold on the Instagram Interface.
Now, let’s get started.
Creating Instagram Stories
Once you’ve opened your Instagram Stories camera, by swiping to the right or clicking the camera button in the top left corner, you’ll see a large shutter button & some text beneath it. These are your various styles for Instagram Stories. Most are videos, but we’ll have a look at them all.
P.s. You can also add a pre-made video to your story by selecting your camera roll & choosing a clip, or add multiple photos to your Instagram Story at once, but we’re looking at creating here. So, let’s get into what each of these styles can do.
Text
First up we have the standard text. In the bottom left you’ll see a color icon where you can scroll through various backgrounds and then just type into your text. We’ll look into the text a bit more in the customization category below.
Live
Easily start a live stream by swiping to live in your Story camera.
Normal
This is the default area you land when you open up your Story. By pressing the shutter button, you can take an image for your Story & by holding the button in, you’ll record a video. It’s quite normal.
You can zoom in whilst recording a normal Instagram Story, though. Whilst you’re holding down the shutter button, slide your finger towards the center of your screen to zoom in, and slide it back towards the shutter to zoom back out.
There is also no need to worry about keeping your Instagram Story under 15 seconds if need be. The video recorder automatically splits them into multiple Stories when you have the shutter button held down.
Boomerang

What do you call a boomerang that doesn’t come back? A stick.
In this case, though, you’d just call it a normal video.
Boomerangs capture a bunch of images & then loop them over and over again to create a moving image or boomerang video.
To create your own Boomerang, tap the shutter button to capture the action or hold down the shutter button if the action is very short.
Short, smooth actions work best here, as it’s looped. Try winking, jumping, or recording a husky howling at you, for the best effect.
Superzoom
This style allows you to select a point on the screen and zoom in on it. There are a few different effects that you can scroll through that come with different sound effects & music to create a more dramatic or funny Story.
To create your Superzoom:
- Select Superzoom
- Scroll through the various emojis above the shutter button & select the one that you want to use.
- Select a point on the screen to focus on.
- Tap or hold down the shutter button to capture your Superzoom.
Focus
The Focus style searches for faces on-screen & blurs out the rest of your background.
It works much like the normal style. You can take an image, record a video & still manually zoom in & out whilst recording.
Rewind
Your video will be played back in reverse. You can hold down the shutter for this one or just tap the record button to start recording.
Hands-Free
Much like Rewind, this is quite self-explanatory. The hands-free style allows you to record videos without having to hold down the shutter/record button. This is useful for things like cooking, makeup tutorials, etc. Anytime you want to record something but you can’t keep a finger on the button.
Customizing & Editing Instagram Stories
When it comes to editing Instagram Stories and adding a little bit of extra magic, there are quite a lot of features & functionality we can use.
Face Filters
If you’re wondering what exactly face filters are, imagine those bunny or dog ears you must’ve come across when looking at your niece or nephew’s story. Those are face filters, but there are actually quite a lot of useful filters, besides a pair of ears.
To access the face filters, make sure your front-facing camera (a.k.a. Selfie camera) is selected & you are in one of the recording styles that allow face filters: Live, Normal, Boomerang, Rewind & Hands-Free.
Next, select the smile icon on the right of the shutter/record button.
You’ll then see a variety of face filter options appear at the bottom of your screen. All that’s left to do is find one that you like, select it & start recording.
Adding Text
Once you’ve created your video, image, or boomerang, you’ll land on the editing screen. Here you can do a variety of different things to spice up your Instagram Story. One of these editing options is to include text in your Story. Here’s how.
- Select the Aa button in the top right.
- Select a generic color at the bottom of your screen.
- Type or paste in your text.
- Choose a font style by selecting the button in the middle of your screen that shows what style you’re currently using, it should be classic but it could also be one of the other 5 options (classic, modern, neon, typewriter, or strong).
- All finished? Hit done in the top right of your screen.
- Pinch to resize the text, tap, and holding allows you to drag it, and tapping the text allows you to edit.
By including two or more different text styles you can create an engaging and interesting story whilst emphasizing certain words. Similarly, different sizes of the text, as well as colors, can create another basic yet remarkably interesting effect.
Protip: You can mention an Instagram user in your Instagram story by typing out the @ symbol followed by their @handle. This will create a clickable link to their account & they’ll be notified of your mention in their DMs.
P.s. This works with hashtags as well. Unlike posts where you’re able to add 30 hashtags on Instagram, you can only include 11 to your Instagram Story, however. Still, that’s plenty to target specific hashtags and possibly get your Story featured for that hashtag.
Freehand Drawing
Whether it’s something basic like a few arrows, or a more complicated image, Instagram Stories have a variety of different brushes & markers that allow you to express yourself more.
Here’s how to start drawing.
- Select the marker button in the top right of your screen.
- Choose from one of the five pen/marker styles at the top of your screen. (fine-tipped, angled, neon, eraser, or chalk)
- Adjust the size of your marker using the slider on the left.
- Select a generic color from the menu at the bottom of your screen.
- Start drawing & select the tick in the top right corner when you’re done.
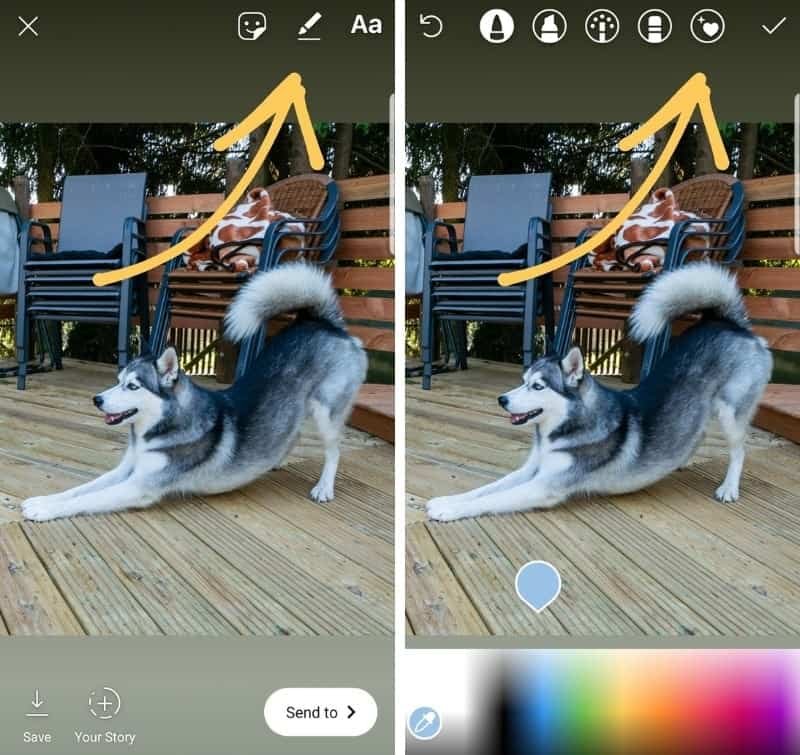
P.s. You can select colors by using the eyedropper tool as well, tap the pipette icon at the bottom of the screen and then drag the eyedropper tool over whichever color you would like to use.
You can also select a completely custom color by pressing and holding over a generic color and then dragging the selection to your desired color.
Solid Colour Background
To easily create a solid fill background color, follow two quick steps.
- Select the marker tool & the color of your choice.
- Tap & hold anywhere on the screen for 3 seconds.
That’s it, you now have a blank canvas in whatever color you’d like.
Masked Effect
One of the best effects to implement with a solid background is the Masked effect.

Here’s how it works.
- First, create a solid background color for your Instagram story.
- Next, select the eraser marker.
- Lastly, eraser parts of your solid background to reveal parts of your story beneath it.
One fun aspect of this effect is that you can even use it in your videos and Stories. ? ?
GIFs
GIFs seem to have taken over the internet in the last few years, and Instagram allows you to include all kinds of GIFs in your Stories. They can also easily add an extra element of fun & engagement to your posts.
To add a GIF to your Story, follow these steps.
- Swipe up on your screen.
- Select the flashing GIF icon from the menu.
- Scroll through the trending GIFs or search for a keyword by using the search bar.
- Select one that your audience will love.
- Resize & move it around by pinching and dragging it across the screen.
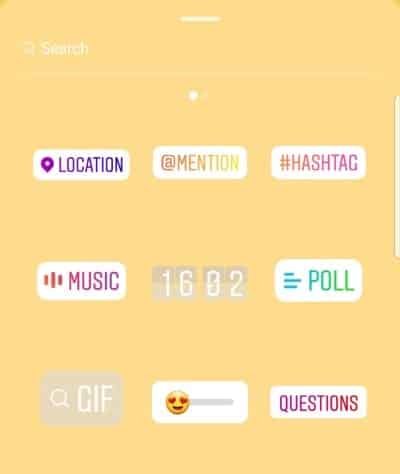
Instagram Stories Special Features
Mention Stickers
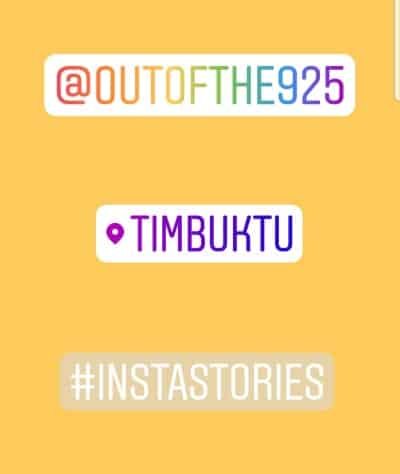
If you’d like to make it clearer that you’re mentioning someone in your Story, you can use @mention stickers. Here’s how to add an @mention to your Story.
- Swipe up on your screen.
- Select the @mention button from the menu.
- Type out the @handle of the account you want to mention.
- Accounts will start appearing above your keypad, select the one that you want to mention once it appears.
- Tap the sticker to change the highlight effect.
Location Stickers
Add a location sticker to your Story to show your audience where you are. This adds some extra insight into your Story & can give your audience a little extra look behind the scenes. If your Story performs well, Instagram may even feature it in that location’s Story.
You can add a location sticker in the same way as you would a mention sticker… select the location button instead of the mention button though.
Hashtag Stickers
The hashtag sticker allows you to highlight a hashtag in your Story. This can be used to describe your story and give your audience some extra insight, much like the location sticker.
You can only add one hashtag sticker to a Story, so if you want to include the 11 available Hashtags, do so by adding text. It doesn’t matter whether you use a hashtag sticker or hashtags in text, both present you with the chance to be featured in that hashtag’s Story.
Other Stickers & Emojis
If you swipe up on your screen (or select the sticker emoji icon in the top right of your screen) you’ll be presented with a menu of various other stickers and emojis. You can use these as you please in your Story to build curiosity & engagement.
Music Clips
A fun way to add something extra to your Instagram Story is to include a music clip. Use them to emphasize the mood, for humor or just to play a bit of a song you like.
- Swipe up on the editing screen.
- Select the music button from the menu.
- Choose a song by searching for it or scrolling through the moods or genres.
- Drag the slider to choose the part of the song you’d like to use.
- If you’re using an image, tap the 15 seconds to adjust the length of the audio (& Story). If you’re using a video, the audio will automatically be cut to the length of the clip, so you just have to drag it to the right point.
Update: You’re now able to use the music clip feature as a recording style.
Share Songs directly from Spotify
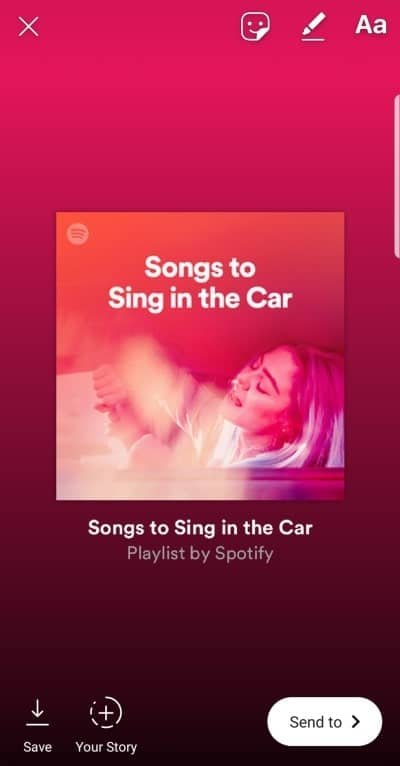
Since the beginning of 2018 Instagram has been opening up its API to allow external apps more usability and interaction with Instagram. One of the obvious changes this meant was that you were able to finally schedule image posts with Scheduling tools like Tailwind, Hootsuite, etc.
One of the features that flew a little more under the radar for most was the ability to now share what you’re listening to on Spotify directly to Instagram Stories. It’s not just songs though, you can also share albums, playlists, etc.
Your audience can then get a glimpse at what you’re listening to, what you like, etc. If they tap on the image or the play on Spotify text, the Spotify app will open up for them and they can listen too. You could even include polls or questions to see what they make of your favorite tracks.
Here’s how to share your Story directly from Spotify.
- Open the Spotify App on your smartphone.
- Navigate to the song, album, artists, etc. that you want to share.
- Tap the 3 dots next to the song or in the top right corner.
- Tap on the share option.
- Select Instagram Stories
- Instagram will now open in the edit screen of your Stories.
- Now you can make any visual edits & add polls, questions, GIFs, etc.
- Once you’re done, just add it to your Story to share it with your audience.
Share directly from the GoPro App
It’s not just Spotify that has teamed up with Instagram though, you’re now able to share your GoPro moments directly to Instagram Stories from the GoPro App.
GoPro’s are all about action & video, so here’s an action-packed how-to video to get you started.
Interacting with Instagram Stories
Everything I’ve mentioned so far has been related to making your Stories look & feel more engaging to capture the attention of your audience. Now we’re going to look at of the ways you can really get clear value through Instagram Stories.
A/B Polls
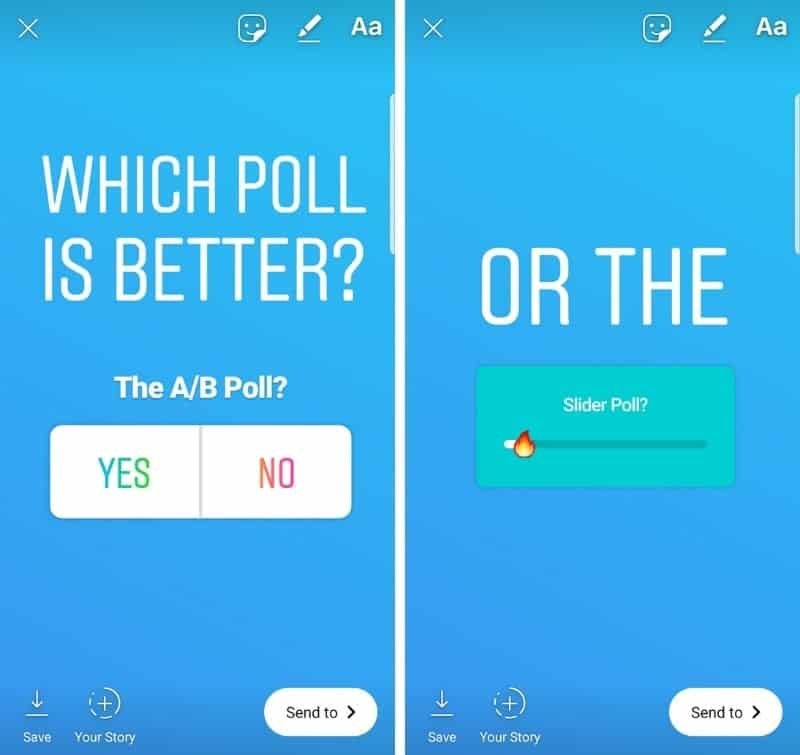
Instagram offers two different types of polls currently. The first is A/B polls. These are polls where you can ask your audience a question & they can choose from two different options.
This is a great feature if you’re showing off some behind-the-scenes content & trying to gather some valuable user input before releasing the final product. It’s actually pretty awesome for most information-gathering purposes, whether that’s what your next great innovation will be or simply what to wear for the day.
Here’s how to add an A/B Poll.
- Swipe up in the Story edit screen.
- Select Poll from the menu.
- Type in your question.
- If you want custom answers, tap the yes & no placeholders to change their text, otherwise, you can leave them as is.
- Tap done in the top right corner & you’ve set up a poll.
Percentage results of the poll will be visible to those that have voted, but only you will be able to see what specific users voted for in your analytics… but more on analytics later.
Slider Polls
Slider polls don’t quite provide as clear of an answer as you would get with A/B Polls, but they’re a whole lot of fun. Or maybe it’s just my obsession with sliders. ?
Anyway, it’s another way of gathering input from your audience that you should incorporate into your Stories.
Adding a slider poll is a similar process to adding an A/B poll.
- Swipe up in the Story edit screen.
- Select the slider icon from the menu.
- Select the color of your text above your keypad.
- Type in your question.
- Select an emoticon for your slider.
- You can then change the slider background color by selecting the A icon in the top center of your screen & selecting a color from the options above your keypad.
- Once you’re satisfied, hit done in the top right & watch those emojis fly.
Ask Questions
Questions are one of the best ways of gathering input. You can either ask your audience a specific question you want the answer to, or you can ask them to submit questions to you. You’ll then be able to then answer in your Instagram Story (or wherever else).
These are particularly great if you want to do a Q&A, but you’re not quite sure where to start.
- Swipe up in the Story edit screen.
- Select the Questions button from the menu.
- Type in the question (or ask your audience to submit questions for you to answer).
- You can then change the background color of your question by selecting one of the generic colors above your keypad.
- Once you’re satisfied, hit done.
You’ll receive all the replies in your DMs.
Repost stories you’re mentioned in
If someone @mentions you in their Story, you can repost that story to your own!
When you’re mentioned in a story you will receive a DM telling you about the mention & giving you the option to repost it to your own Story.
Tap the Add this to your story button to repost it.
Whilst this feature only works if you’ve been tagged in the Story, it can be a great way to get customers to help market your products if you’re a brand. Just ask customers to tag your account in their related Stories for a repost.
Share posts to your Story
Whilst I may have touched on how Instagram Stories can indirectly improve your engagement rate by having people interact more with your account, you can take this one step further & share your Instagram posts directly in your Story. This creates a clickable link that will take them directly to that Instagram post.

It doesn’t even have to be your own Instagram Post, if you love an awesome post & feel that your audience needs to see it, share it directly in your Story.
Sharing a post is quite quick.
- Open the post you want to share (your own or someone else’s).
- Tap the paper plane icon beneath the image.
- Select Add Post to your Story.
- Tap the image to change the style.
- Add any other Story features you’d like.
- Once you’re satisfied, share it with your audience.
P.s. If you’re sharing someone else’s post, it’s good practice to also tag or mention them in the same Story. As you are not currently notified if someone shares your post.
Add Links
You can add direct links to external websites, like your site, blog, YouTube channel, store, charities, your grandma’s Facebook page, etc. All you need to do is select the links sticker and add the link to your preferred webpage.
While Instagram made it difficult in the past, they’ve realized that users will go find other platforms if they can’t monetize on their platform effectively and linking is often the best way to do that.
Instagram Highlights
What are Highlights?
Instagram Stories are only visible for 24 hours and then they disappear. Highlights are for those important Stories that you want to last a little bit longer. These are Stories that get stored in collections and are pinned to the top of your profile indefinitely.
You can use highlights to share important information about yourself, your business, promotions, your equipment, etc. As Highlights are just a collection of Stories, you can even include links once your profile is past 10 000 followers.
Creating Highlights
When it comes to creating your first highlights, you have two options.
Option 1, if you have Instagram Stories that have already expired (i.e. older than a day).
- Open your profile.
- Open your archive by tapping the anti-clockwise clock icon in the top right corner of your screen.
- In the top left, tap on Posts archive & then select Stories archive from the drop-down.
- Select an Instagram Story you would like to save as a Highlight.
- Tap on the highlight button in the bottom right corner.
- Give your Highlight a name.
- Tap Add when you’re done.
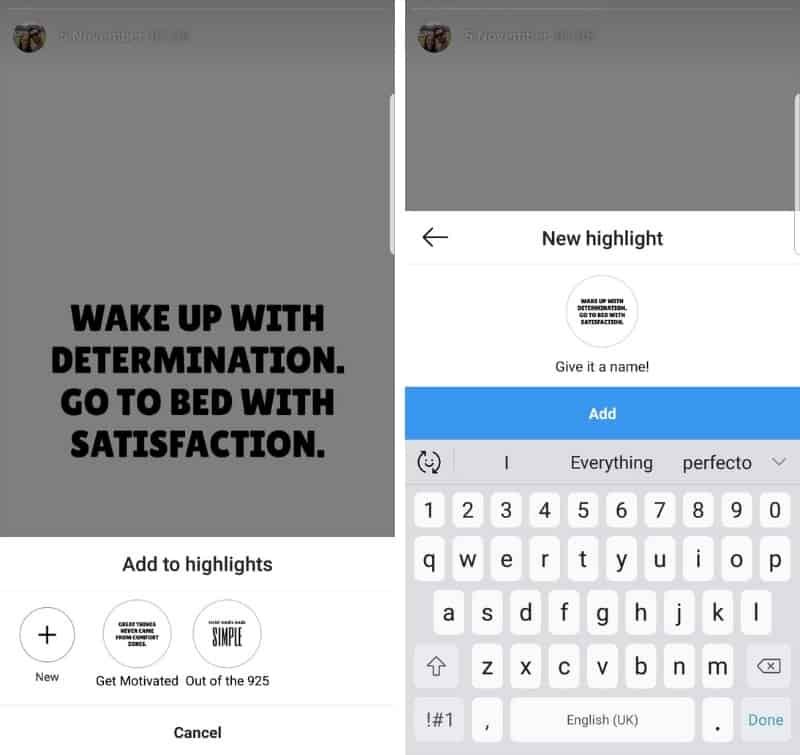
Option 2, if you want to add a current Story to a highlight.
- Tap on your profile image to open your Stories.
- Tap the highlight button in the bottom right corner.
- Give your highlight a name, then tap Add.
To add additional Stories to a highlight or to edit a highlight, open the desired highlight & tap on more in the bottom right corner. Tap Edit Highlight and now you can change the name of the highlight, the cover image, and add or remove Stories from that highlight.
What you cannot do is arrange your Stories in a particular order. Keep that in mind when posting and saving your Stories, as these will play in the order they were uploaded. The first upload will play first, etc.
Another thing to note is that in order for a Story to be saved indefinitely to a Highlight, it needs to survive the full 24 hours as a Story. If you delete the Story before a day has passed, it will disappear from any added highlights.
Changing Highlight Covers/Icons
One of the first things you may want to change when creating a Highlight is the cover or Highlight Icon. It’s also a great place to add a little bit of branding to your profile and can give it a really neat and professional touch.
Here’s how you can edit your Highlight Covers.
- Navigate to the Highlight you want to edit.
- Select More in the bottom right corner.
- Tap Edit Highlight.
- Tap Edit cover.
- Select an already uploaded Story as your cover.
You no longer need to use an already uploaded story however & can just upload an image without it appearing in your story. Here’s how to do it.
- Follow the previous steps to edit your Highlight cover. Instead of selecting an already uploaded story, however, tap on the camera roll icon on the far left to upload a new image.
- Select the image you want as the cover and align and resize as you would like.
- Tap Next in the top right corner & then tap done on the next screen.
Now you can update your Highlights with covers that aren’t going to interrupt your audience when they’re looking through your Highlights.
Here are a few great examples of highlight covers done well.
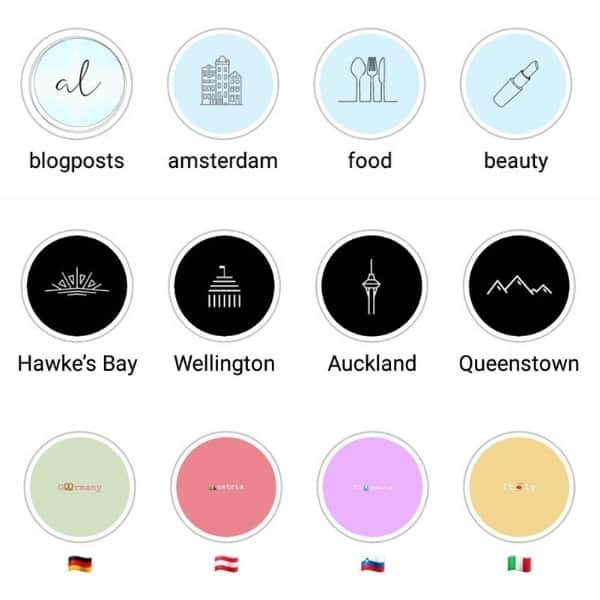
If you’d like to create your own highlight covers, Canva is a great free tool, with various different icons to make awesome covers.
Insights for Instagram Stories
Like Instagram Posts, with Stories, if you have a business account you have access to a variety of different analytics and insights to analyze your Stories & see which Stories get the best results for you.
If you haven’t got a business account yet, you can easily switch to one for free.
How to access Story Insights
Once you have switched to a business profile, only Posts & Stories uploaded after switching will show analytics. Here’s how to access your Story Analytics.
- On your profile, tap the anti-clockwise clock in the top right corner to access your archives.
- Make sure the Stories archive is selected from the drop-down menu in the top left of your screen.
- Select a Story that you want to see the analytics of.
- Swipe up on your screen & the Insights screen will appear (otherwise click on the icon on the left of your screen).
Your Story Insights only become available after your Story has been active for 24 hours.
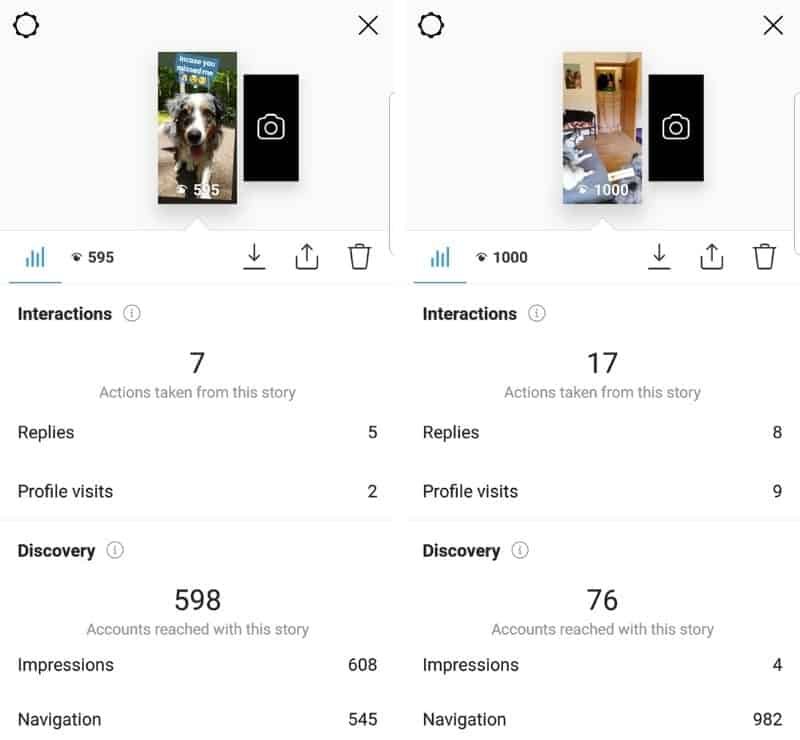
What information can you obtain from your Instagram Stories Insights?
- Interactions – The number of Profile visits, replies, etc. taken from that Story.
- Discovery – The number of accounts reached with that story.
- Impressions – The total number of views your Story has received.
- Follows – The number of users that followed your account after viewing your Story.
- Back Navigation– The number of times someone taps to go to your previous Story.
- Forward Navigation– The number of times someone taps to go to your next Story.
- Next Story – The number of times someone swipes to skip to the next user’s Story.
- Exits – The number of times someone leaves the Story viewer whilst viewing your Stories.
All of these Insights can be used to create better and more engaging Instagram Stories for your audience.
For example, if you’re getting a lot of taps forward, it could indicate that your Stories aren’t engaging enough, they’re too long, or that your Call-to-actions are too close to the sides, creating false forward or backward taps.
When analyzing these Insights, it’s best to accumulate a few Instagram Stories that tell a particular Story to best judge where and why users have left your Story or tapped backward to watch it again.
Final thoughts on Instagram stories
There are plenty of different features and functions to play around with to create more engaging and fun content for your audience.
Instagram stories can be used to link out to your other platforms, share more useful information, or to show a little bit of your “behind-the-scenes” to your followers.
It can be a great tool to help increase your Instagram reach and engage your audience and is something worth considering using more often.
Hopefully, this guide has made it easier for you to utilize all of the awesome features that Instagram Stories offers.